Truck Update 11/17/19

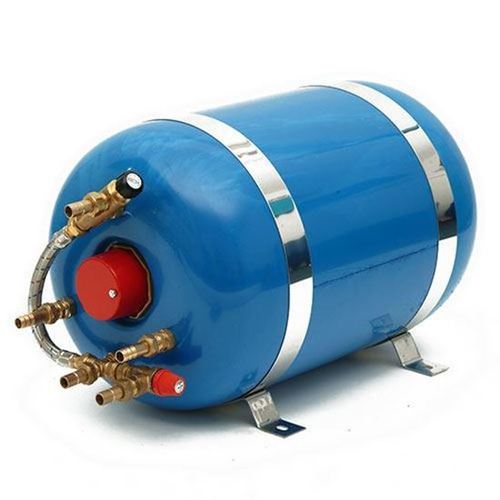
We just finished the hot water heater installation. While we were working on the water system modification, we also added the provision to winterize the water system. We made a little fitting that snaps into the jerry can quick disconnect under the sink so that compressed air can be used to blow all the water out of the system.

We ended up going with the 12V Elgena NC6-E Water Heater from Total Composites. It seems like a nice little unit, and we think it is about the right size for the intended use. It takes a little while for the water to come up to temperature, but after testing it, it seems to play nice with the solar panel system in the truck. The water heater draws around 200 Watts, so as soon as the heater kicks on, the charge controller starts charging the batteries. With 600 Watts of solar panels on the roof, the battery capacity never drops below 100% while the hot water heater is running on a sunny day. Pretty slick.

We put a quick disconnect in the shower to easily disconnect a stainless braided 5 foot long shower hose and spray head. It’s a nice length because it can reach out through the door of the habitat, so you can choose to shower indoors or outdoors. Prior to our trip, several people said that they liked to shower outside and we were a bit skeptical. However, we found that we completely preferred showering outside during our trip, so I’m not sure that we would use this setup to shower inside very often, but it’s all set up for indoor or outdoor showering with hot water now.

We’ve also been doing a lot of little things on the truck. The truck is in about the best shape it has ever been.

Truck Update 11-3-19

Back in the Barn
Back in the Barn

Now that we have the truck all cleaned up, we have moved it back to the hangar to do a little bit of maintenance and some minor mods. Our driveway is at a terrible slant for doing some work, so it’s great to have it back in the super level hangar for a while.

The first thing on the to-do list was to change the engine oil. It’s always fun to work on this truck because everything is super accessible. I always dread changing the oil on smaller cars because you have to jack them up and crawl underneath them. Not so on our Mog! It’s great to just sit cross-legged and comfortably drain the oil and change the filter at eye level. The filter is also a super easy to service paper cartridge inside of an o-ring sealed aluminum casing. We’ve always been happy with how serviceable the truck is.

While I was at it, I serviced a few other things. I changed out a ball valve that I installed to turn off the auxiliary air system. The ball valve that I had previously installed was working fine, but I didn’t like the handle on it, so I replaced it with a much nicer valve. While I was down there I did a lot of other little things like inspect the air system and lubricate the battery box locks. I also got a good chance to inspect the chassis. Everything looks great. Overall, a good day of maintenance and the truck is happy.

Truck Update 10-20-19

Now that we are home, we spent quite a bit of time inspecting the truck and cleaning everything. It did great on the trip and shows very little wear. The bulk of the cleanup was just washing little bits of arctic mud out of the nooks and crannies of the exterior. The exterior cleaned up really nicely. We gave the whole habitat interior and cab a nice deep clean. We thoroughly wiped everything down, vacuumed, touched up paint, etc. The inside of the habitat looks almost exactly like it did when we finished it in the spring.

All Clean After the Trip

We were really happy with the way the Tern Overland windows handled the nasty conditions up north. They didn’t leak at all, the integrated blinds and screen were awesome, and the double thickness was super warm and cozy. We were a little bit concerned that they would get scuffed by tree branches, but it didn’t end up being as bad as we thought. They did end up with some scuffing, but this week, we tried a 3-part polishing compound that really cleaned them up. They look as good as new, so we are really happy with that.

There were a few things that we had mentally been keeping track of to work on when we got home. We cleaned, prepped, and re-painted a few areas on the undercarriage of the truck that had gotten a bit chipped by pebbles along the way (front of the fuel tank and rear fender guards). We replaced the rear muffler mount as we didn’t like how it behaved on the rougher roads; it’s much better now.  We also fixed a minor clearance/rubbing spot on one of the rear fenders. Basically, the to-do list was super small considering the length of trip that we went on.

The truck is in super great shape now. Other than the hot water heater upgrade work that we are doing, the truck is ready to take on another adventure.

Truck Update 10-13-19

In the spring as we were finishing up the truck, we had some specific dates that we wanted to hit for starting our summer travels. The prime window of travel in the far north is pretty narrow, and we wanted to make sure we got there as soon as some of the river crossings opened. As our departure time approached, we had made it pretty much through our entire truck to-do list, but we decided to defer installing the hot water heater until we got back. Surprising as it might seem, we did the whole 5 month trip without a hot water heater and really didn’t miss it. We found that because we stored our water inside the habitat that it was always in the 70-75 degree F range which was quite comfortable for washing hands, face, and dishes. For showering, we would heat a specific amount of water in a kettle on our alcohol stove. We had a digital thermometer and we would heat the water to 107 degrees F. It actually worked perfectly; the water temperature was great and it really helped us ration water as we knew exactly how much we were showering with.

Now that we are back, we are finishing the hot water installation. There is a large area for the hot water heater reserved underneath the forward dinette bench behind the shower wall. From the beginning, we only planned to plumb hot water to the shower as the kitchen seemed fine with room temperature water.

SureCal 22 litre 5_81 gal Horizontal Single Coil Calorifier

Originally, we planned on installing a sailboat calorifier that would take hot coolant water from the engine and circulate it through a heat exchanger in the calorifier’s insulated tank. We liked that it would heat the water while we were driving using waste heat and that we could use our engine pre-heater to heat the water when not driving. Some of the downsides to the calorifier option is that the calorifier that we have is really larger than we would ever need; it is 5.8 gallons. Also, it has some system complexity by tying the engine coolant system to the habitat hot water system.

On the trip we were really pleased with how our solar and lithium battery combination performed. Even when the weather was cloudy for several days in a row, we used a lot of power extensively in the evening, and we had the truck in a dark ferry hold, the lowest we ever got the batteries was 88% charge state. This lead us to start thinking about using some of the battery and solar capacity to run an electric hot water heater. There are several nice, small 12-volt electric hot water heaters available now. Even at full power they only draw 200-300 watts, so with full sun on our 600 watt solar array, they wouldn’t even put a dent in the battery capacity. They are smaller, though, at only 1.5-1.6 gallons, but in a way that is nice because it would heat quickly.

So we are in comparison mode and looking at the pros and cons of the systems. Both would be great for different reasons.

Truck Update 4/28/19

Our list of truck work from this past week seemed small to us when we typed it up. There has been a lot going on getting ready for our upcoming trip(s). It is impressive how all the small details take time (getting new keys made, mail forwarding considerations, doctor’s appointments, weeding the yard, insurance updates, etc.). We are planning to do several local test trips to make sure everything is working well, and we were able to do the first test trip this week. It went really well and we identified some changes that we wanted to make for small item storage and provisioning.

Also this week, Yvonne tested out her sewing machine on the inverter. Long story short, her sewing machine didn’t like inverter power and we ended up trying 4 different inverters and 4 different sewing machines. It turns out that some sewing machines are just incredibly picky about power quality, even from a high quality, high capacity pure sine wave inverter. The good news is that we now have a nice Victron pure sine wave inverter and Yvonne has a new “travel” sewing machine that is perfectly happy running off of the Victron inverter. All good news as we near the home stretch of preparations.

  • Took truck on short road trip
  • Inspected truck after trip
    • No leaks, everything looked good
  • Packed under subframe storage boxes
  • Started designing bathroom door
  • Purchased spare fluids for truck
  • Installed new Victron inverter
  • Installed cargo tiedown straps in underbed storage area
  • Started testing sewing machine ergonomics and function
  • Started fabricating bathroom door
  • Finished layout of bathroom door
  • Added pressure relief valve to electric air compressor manifold
  • Lots of trip preparation and logistics planning/organizing
  • Final bonded bathroom door
  • First test trip
  • Laid out all mounting holes on door
  • Applied first coat of paint on door
  • Purchased and installed additional containers for provisioning and organization
  • Moved in clothing
  • Received National Parks pass
  • Cut and urethane sealed oak bathroom door trim
  • Final bonded and assembled bathroom door
  • Installed bathroom door with mirror, waste basket, door handle, closing spring and towel bars

Truck Update 4/21/19

  • Started trip route planning
  • Replaced cabinet hinge pins with small stainless steel bolts and lock nuts
  • Added foam shock cushion to air heater fuel pump mount
  • Added footman’s loops and Velcro straps to secure kitchen cabinet doors
  • Modified/improved engine pre-heater switch mounting in truck cab
  • Turned off axle fording air supply (turned off air regulator)
  • Researched:
    • Other locking fuel tank cap options
    • Air heater ducting insulation
    • Speedometer upgrade options
    • Entry ladder modifications and storing options
    • Electric air compressor wiring modification
    • Engine pre-heater use procedure
  • Bonded and cut foam for Fantastic Vent plug
  • Fabricated pour spout for gallon alcohol cans (for stove fuel)
  • Organized spare parts, extra material, and provisioning
  • Researched electronic maps for route planning
  • Received 2019 Milepost Alaska trip planning book
  • Corresponded with electronic speedometer company
  • Ordered programmable electronic speedometer and sending unit
  • Filled, pressurized, and tested fresh water system
  • Filled and test drained gray water tank system
  • Rewired inside of ARB air compressor
  • Ordered and received material for new speedometer bezel
  • Ordered, received, and installed food grade rubber hose for faucet to sink
  • Received and installed new locking fuel cap
  • Purchase pneumatic components for air compressor installation
  • Purchased hose to drain gray water tank
  • Received heater duct insulation
  • Installed heater duct insulation
  • Fabricated rubber compressor mount pad
  • Installed electric air compressor
  • Plumbed air compressor into truck pneumatic system
  • Started routing air compressor wiring
  • Started laying out new folding ladder design
  • Ordered and received components for auxiliary air take-off system
  • Purchased wheels for new folding ladder base
  • Removed and cleaned section of forward gladhand stainless steel line from truck pneumatic system
  • Added regulated air take-off from high pressure side of truck pneumatic system
  • Removed old speedometer and speedometer calibration gearbox from transmission
  • Cleaned up speedometer calibration gearbox
  • Cut up (newly purchased) folding ladder to make parts for new folding habitat ladder
  • Machined new Delrin bezel for fitting new speedometer in old dash panel hole
  • Started bolting new habitat ladder together
  • Fabricated compression plugs for inside tubes of new ladder assembly
  • Finished wiring electric air compressor
  • Tested electric air compressor and filled truck tanks with engine turned off
  • Started fabricating ladder wheel mounts
  • Received new programmable electronic speedometer
  • Wired lights for new speedometer
  • Fabricated wiring harness for new speedometer
  • Fabricated steel upper mounting tabs for new ladder
  • Modified existing habitat ladder mount to accommodate old and new ladders
  • Re-installed ladder mount on habitat sub-frame
  • TIG welded new ladder mounting bar assembly
  • Match drilled pit-pin holes in new ladder mounting bar assembly
  • Sand blasted and painted new ladder mounting bar assembly
  • Wired and installed speedometer
  • Finished fabricating ladder wheel mounts
  • Sewed cloth cover for Fantastic vent fan plug
  • Received hall effect sending unit for speedometer
  • Sewed drawstring bag for portable propane stove regulator
  • Sewed drawstring bag for portable propane stove
  • Started designing transmission mount for speedometer sending unit
  • Started planning local test trips
  • Started populating truck with provisioning goods
  • Finished fabricating new folding entry ladder (new folding ladder also doubles as a step ladder)
  • Added footman’s loops under bed for securing cargo
  • Tested stowing and setting up sewing machine and OLFA cutting mat
  • Tested invertors and decided to purchase pure sine wave invertor
  • Tested hall effect sensor proximity range
  • Fabricated hall effect sensor mount for speedometer sending unit
  • Bench assembled and tested hall effect sensor assembly for speedometer
  • Installed hall effect sensor sending unit assembly for speedometer
  • Opened up padlock hole for securing spare tire
  • Designed bathroom door
  • Made bond test sample for bathroom door assembly
  • Working toward making final orders to prepare for departure
  • Calibrated speedometer using GPS and radar speed indicator
  • Purchased bathroom door material

Truck Update 4/14/19

  • Added additional heater duct in kitchen wall
  • Tested heater configuration
  • Increased max regulated engine speed from 2600 to 2750 rpm
  • Advanced engine injection timing by 2 degrees
  • Increased injection fuel delivery to ~170 hp setting
  • Tested driving performance after upgrades: noticeable improvement in hill climb / acceleration
  • Purchased tools and materials
  • Applied Wabi-Sabi Overland vinyl decals to habitat and truck
  • Drilled holes in water Jerry cans
  • Installed machined barb bulkhead fittings in water Jerry cans
  • Leak checked water Jerry cans
  • Stowed water Jerry cans in habitat
  • Received:
    • Front portal tank upgrades
    • Drive train boots
    • Portal axle fluid
  • Drove truck to heat up fluids
  • Drained transmission for 2nd fluid change
  • Drained front portal hubs
  • Removed front portal vents
  • Test fit new front portal reservoirs
  • Purchased:
    • Copper crush washers
    • Permatex for drive shaft boot install
  • Started making hardware kit for portal tank upgrade
  • Drilled holes in portal tank caps
  • Machined portal tank dipstick pins
  • Machined portal tank vent return tubes
  • Welded dipsticks
  • Welded vent return tubes
  • Turned down cap screws for inner most portal tank cover holes
  • Installed new front portal tanks
  • Plumbed front portal vents
  • Filled front portal vents
  • Drained residual fluid out of transmission
  • Sealed and installed transmission drain plugs
  • Removed old drive shaft boots
  • Prepped and installed new drive shaft boots
  • Refilled transmission with new fluid

Truck Update 4/7/19

  • Received shower plumbing fittings
  • Received entry door grab handle mount hardware
  • Received gray water tank hold down hardware
  • Cleaned and sealed driver side under subframe storage boxes
  • Riveted rubber Jerry can support bumpers
  • Started looking at injection pump adjustment access
  • Installed
    • Driver side under subframe mount
    • Under subframe storage boxes
    • Driver side Jerry cans
    • Gray water tank
  • Plumbed kitchen sink to gray water tank
  • Installed gray water tank vent tube
  • Installed gray water tank vent valve
  • Measured toilet vent fan splash guard area
  • Started laying out shower drain plumbing
  • Purchased additional plumbing parts for shower drain
  • Final installed air heater exhaust muffler
  • Secured air heater intake silencer
  • Ordered steel for rear bumper assembly
  • Recieved entry door grab handle
  • Fabricated toilet vent fan splash guard
  • Cut stainless steel screen for toilet vent fan splash guard
  • Final installed toilet vent fan splash guard
  • Started looking at habitat door hold open catch
  • Installed shower drain plumbing assembly
  • Connected shower drain to gray water tank
  • Fabricated external entry door grab handle mount assembly
  • Installed external entry door grab handle
  • Started looking at ladder storage
  • Started looking at passthrough door hold open catch
  • Located passthorugh door bump stop
  • Started designing forward internal entry door grab handle
  • Bench assembled electric air compressor to truck manifold
  • Received rear bumper material
  • Received tire air gauges
  • Finished fabricating forward internal grab handle components
  • Fabricated passthrough door bump stop
  • Fabricated bracket assembly for entry door hold open catch
  • Installed forward internal grab handle
  • Installed electric air compressor manifold onto truck
  • Installed footman’s loop in passthrough for door open catch
  • Bonded passthrough door bump stop
  • Installed entry door hold open catch bracket and footman’s loop
  • Cut steel for rear bumper tube
  • Tack welded full length of bumper tube
  • Final welded bumper tube joints
  • Cut clamp up tubes for mud flap bolts
  • Welded clamp up tubes into bumper
  • Fit checked bumper tube on truck
  • Primed and painted bumper tube
  • Stenciled fuel tank and Jerry cans
  • Reamed out mud flap bolt holes on bumper tube
  • Prepped weld location for bumper mount
  • Mounted bumper to truck
  • Touched up paint on bumper assembly
  • Cut rubber for mud flaps
  • Cut aluminium for mud flaps
  • Made bolt kit for mounting mud flaps
  • Put reflective tape on bumper
  • Installed mud guards and flaps

Truck Update 3/31/19

  • Removed forward gladhand line
  • Fit checked gray water tank and located sink drain fitting
  • Plumbed fuel line for pre-heater
  • Wired pre-heater and pre-heater pump
  • Test ran pre-heater
  • Ran speaker wire and tested speakers in cab
  • Installed Noico sound deadening mat over driver
  • Wired and tested GPS odometer
  • Started modifying gray water tank
  • Fit checked hose barbs on gray water tank
  • Mounted speakers in cab
  • Tested alternate pre-heater control switch
  • Decided to change pre-heater control to single switch instead of “smart controller”
  • Final wired pre-heater and tested pre-heater
  • Wired 12V compressor relay circuit (for future 24V compressor)
  • Reprogrammed GPS odometer to default to miles
  • Looked at hab entry door grab handle positions
  • Purchased gray water tank internal tubing
  • Sealed firewall passthrough hole
  • Added additional power ground location inside cab
  • Modified gray water barb fittings to better accommodate hose
  • Final assembled gray water tank
  • Labeled gray water tank with stencil
  • Clearanced gray water tank hold down and touched up paint
  • Organized tools
  • Cleaned storage boxes for under subframe on driver side
  • Started looking at under subframe storage locking options
  • Trimmed 12mm stainless air line for electric air compressor to truck interface
  • Cut metal for storage box lock mount
  • Welded lock assembly for under subframe storage boxes
  • Welded two footman’s loops for storage box anti-rattle strap
  • Clearanced back of under subframe storage box mount
  • Enlarged rivet holes for jerry can bumpers on under subframe storage box mount
  • Purchased shower drain tubing
  • Purchased paint for under subframe storage box mount
  • Sewed anti-rattle strap
  • Prepped, seam sealed, primed, and painted under subframe storage box mount

Truck Update 3/24/19

  • Reviewed fuel filter change and fuel bleed procedure
  • Worked on auxiliary systems fuel tank mounting design
  • Refreshed memory on how to:
    • Adjust max governed RPM
    • Advance engine injection timing
    • Increase injection pump fuel delivery
  • Reviewed engine pre-heater controller options
  • Removed engine components to gain access to fuel filters
  • Removed old fuel primer pump
  • Installed new fuel primer pump
  • Replaced both fuel filters
  • Bled fuel system
  • Reassembled removed engine components
  • Ran engine and checked for leaks
  • Tested out variety of way to access engine pump adjustment
  • Inspected air filter (nice and clean)
  • Trimmed interfering material away from gray water tank hold down
  • Prepped and primed gray water tank hold down
  • Seam sealed gray water tank hold down
  • Painted gray water tank hold down
  • Ordered gray water tank fittings
  • Reviewed heater and pre-heater fuel line hardware
  • Reviewed electric air compressor wiring
  • Reviewed pre-heater wiring
  • Reviewed speaker wiring diagram
  • Disconnected winch from truck batteries
  • Purchased small filter for diesel air heater
  • Drilled holes in fuel tank for heater and fuel heater fuel supply
  • Used magnets inside tubing to remove any metal particles from inside tank (it worked really well)
  • Trimmed fuel fitting standpipes to prevent heater from completely draining truck fuel tank
  • Mounted fuel fittings in fuel tank
  • Test ran electric air compressor
  • Installed air heater fuel pump
  • Finished air heater installation and purged air from fuel lines
  • Test ran air heater
  • Disposed of old engine coolant
  • Topped off engine coolant
  • Received gray water tank fittings
  • Test fit jam nut on power steering box (12M-1.5)
  • Extended wire length for speakers
  • Installed filter and fuel pump for engine pre-heater
  • Purchased switch for engine pre-heater
  • Ordered additional air heater ducting and swivel vent
  • Fabricated GPS odometer, compressor, and pre-heater switch bracket dash panel
  • Painted switch bracket dash panel
  • Bench assembled and installed switch bracket dash panel
  • Removed unneeded / redundant passenger seat lap belt
  • Tested out additional heater duct in kitchen (we will likely add more ducting)
  • Cut witness groove in end of power steering adjustment stud (to maintain original reference position)
  • Removed power steering adjustment jam nut and cleaned threads
  • Installed new seal and jam nut on power steering box
  • Adjusted steering slop out of power steering box
  • Test drove truck to check steering play
  • Washed truck