First Jeep Camper Ready for Road Testing

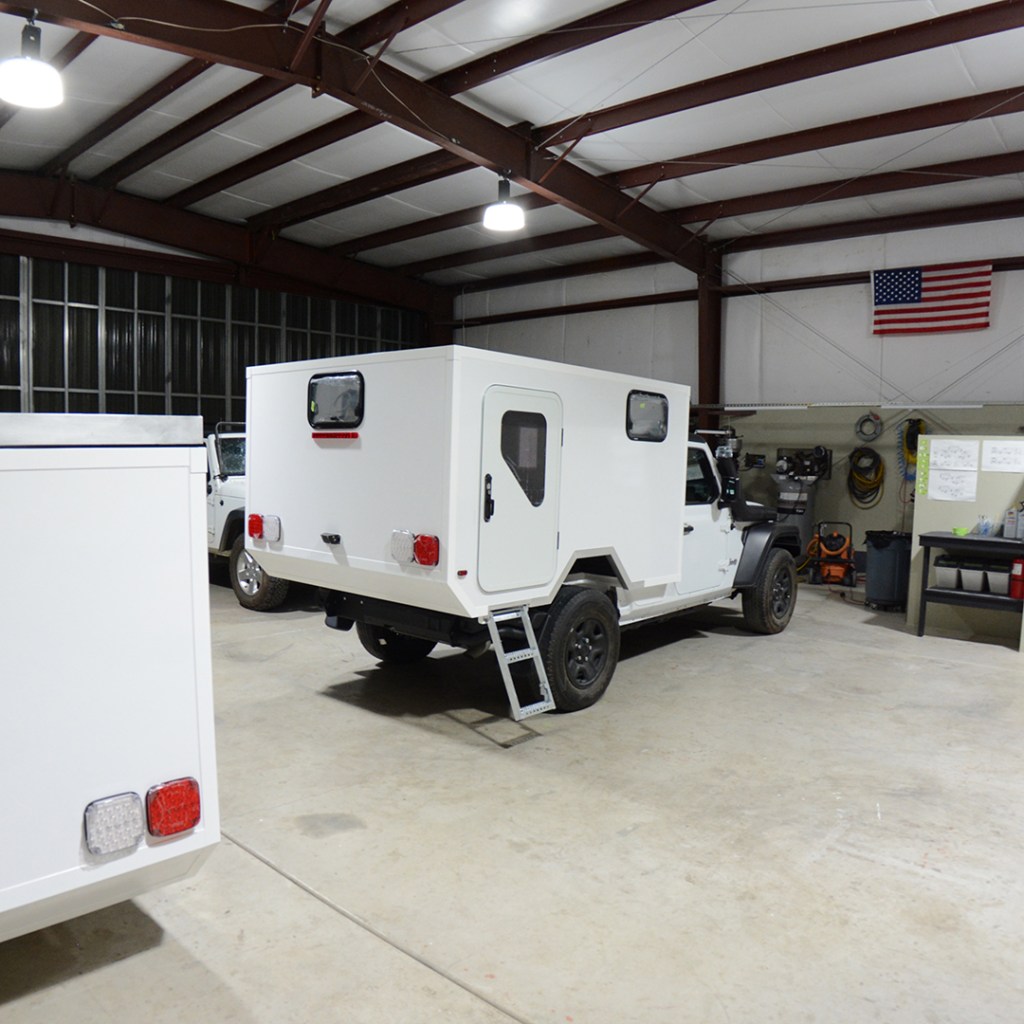
After months of crazy hours of working in the shop, the first of the two Jeep campers is all finished on the outside and ready for road tests. I’m really happy with how it turned out, and I think it will be a really great little travel vehicle for Yvonne and me. The inside of the camper is still totally empty, but we will still be able to take it on some test camping trips in the short term.

It is satisfying to finish the camper pretty much exactly on the timeline goal I had set last fall. I will do a few more things to this camper in the near term, but soon I will transition to installing the second camper on our friend’s Jeep. I’ve been so busy the last few months on this first Jeep that I have admittedly been pretty bad about posting assembly details, so I’ll try to post more often as I dig into the second Jeep, as the second camper is nearly identical.

Jeep Camper Update

This is an overdue update on this project, but here is a super quick rundown of the current state of the vehicle design and build.  Overall, it is going very well. I have been working on the project 7 days a week for the last 6 months and it is all really taking shape now.

  • We relocated back to the large shop space where we built our Unimog in 2017-2019
  • I decided to build two identical jeep campers at the same time (one for Yvonne and I and a second one for a friend)
  • The base vehicles are recent year jeep JLU wranglers
  • The finished vehicle will fit in a standard height sea container for shipping
  • The camper is 6 ft wide and 7.5 ft long inside
  • I am currently building the pop top roof that will be hinged on the forward edge
  • There will be standing height with the top up, and sitting height with the top down
  • I did a lot of design and material trades and decided on a composite sandwich panel build with an integrated steel roll bar attachment
  • I decided to go with a flat sided camper to maximize internal volume
  • I have tried to include some nice detail features like a slide out ladder that stows under the camper floor and a full sized passthrough to the cab of the jeep from the habitat
  • Like normal, I did all of the fabrication work myself (including custom composite wall panels)
  • I was able to remove 623 lb from the original jeep by cutting the back body off
  • Currently the vehicle with the nearly finished camper shell on it is under the original curb weight
  • Including almost all of the intended aftermarket upgrades, the first vehicle is currently 1,235 lb under the max GVW rating
  • After an intense 6 months of building, I “might” have the first one ready for a trip to Overland Expo West (If you are there, come find me a say hi!)
  • A friend has just arrived and is helping a ton with electrical and lots of details before Expo
  • The interior will be totally empty by Expo, but the outside of the vehicle will hopefully be pretty much finished
  • I’ve been posting all the project updates on my Instagram: @wabi_sabi_overland

Small Travel Rig Concept

Small Travel Rig Concept – Front Isometric View

This is a travel rig concept that I’ve been working on in the background for the last few years. It would be a vehicle for the 2 of us to travel in for long overland trips. The habitat has a 4′ by 6’2″ bed (convertible to a dinette), a small kitchen, and a composting toilet. I’ve played around with 23 configurations, and I kind of like this one. This is a pop top with standing height.

I’ve checked the weight and center of gravity and it would work on multiple chassis. Shown here it is incorporated into a Jeep Unlimited JKU, but it would also work on a Land Rover (130?), a G-Wagon (G320?), or a Land Cruiser (HDJ80?).

It’s just a concept, but I’d like to get input from you. What do you think?

Pinzgauer Composite Roof Build

For the last few weeks, we have been working hard making a composite hardtop for the Pinzgauer cab. We finally finished all the composite work and trimmed it this weekend, so we wanted to share the process sequence. It still needs painted before final installation, but it’s basically finished.

We started out by bonding a stack of extruded polystyrene foam into a large rectangular block the size of the roof. We then spent a lot of time carving, sanding, and sculpting the foam into the desired roof shape. We then released it with masking tape and packing tape so that the composite would not stick to the form plug.

The composite layup is 6 ounce woven fiberglass cloth and 4 ounce woven Kevlar cloth in epoxy resin. After all the plies were stacked, wet out, and cured, the roof was body worked and primed before being removed from the truck. After trimming away excess composite material, the roof fits very nicely on the cab. Overall we are really happy with the process and it will be a great improvement over the canvas top.

Truck Update 12/1/19

Well, you might not be hearing from us for a little while as we regroup a bit. We sold the truck to a great experienced overland couple and they came and picked it up. You can follow along on their adventures @searchandrec on Instagram.

Last Truck Photo
Last Truck Photo

We had a lot of mixed emotions as they drove away. It’s strange seeing all of our hard work leave us, but we hope they enjoy the truck as much as we have and they certainly have some cool adventures planned.

We are regrouping a bit for the moment and doing a lot of things on the home front. We have some crazy future ideas, so stay tuned. It will likely be quiet here for the next few months.

Truck Update 11/17/19

We just finished the hot water heater installation. While we were working on the water system modification, we also added the provision to winterize the water system. We made a little fitting that snaps into the jerry can quick disconnect under the sink so that compressed air can be used to blow all the water out of the system.

We ended up going with the 12V Elgena NC6-E Water Heater from Total Composites. It seems like a nice little unit, and we think it is about the right size for the intended use. It takes a little while for the water to come up to temperature, but after testing it, it seems to play nice with the solar panel system in the truck. The water heater draws around 200 Watts, so as soon as the heater kicks on, the charge controller starts charging the batteries. With 600 Watts of solar panels on the roof, the battery capacity never drops below 100% while the hot water heater is running on a sunny day. Pretty slick.

We put a quick disconnect in the shower to easily disconnect a stainless braided 5 foot long shower hose and spray head. It’s a nice length because it can reach out through the door of the habitat, so you can choose to shower indoors or outdoors. Prior to our trip, several people said that they liked to shower outside and we were a bit skeptical. However, we found that we completely preferred showering outside during our trip, so I’m not sure that we would use this setup to shower inside very often, but it’s all set up for indoor or outdoor showering with hot water now.

We’ve also been doing a lot of little things on the truck. The truck is in about the best shape it has ever been.

Truck Update 11-3-19

Back in the Barn
Back in the Barn

Now that we have the truck all cleaned up, we have moved it back to the hangar to do a little bit of maintenance and some minor mods. Our driveway is at a terrible slant for doing some work, so it’s great to have it back in the super level hangar for a while.

The first thing on the to-do list was to change the engine oil. It’s always fun to work on this truck because everything is super accessible. I always dread changing the oil on smaller cars because you have to jack them up and crawl underneath them. Not so on our Mog! It’s great to just sit cross-legged and comfortably drain the oil and change the filter at eye level. The filter is also a super easy to service paper cartridge inside of an o-ring sealed aluminum casing. We’ve always been happy with how serviceable the truck is.

While I was at it, I serviced a few other things. I changed out a ball valve that I installed to turn off the auxiliary air system. The ball valve that I had previously installed was working fine, but I didn’t like the handle on it, so I replaced it with a much nicer valve. While I was down there I did a lot of other little things like inspect the air system and lubricate the battery box locks. I also got a good chance to inspect the chassis. Everything looks great. Overall, a good day of maintenance and the truck is happy.

Travel Log 10-27-19

Now that we are back, we are starting to go through little video clips that we shot during the trip. It’s kind of fun because we can relive little bits of the trip as we go through the files. We think we will probably post some video clips periodically in the coming weeks.

We shot this series of clips leaving an area that we really liked along the Dempster Highway in Yukon, Canada. This spot was a bit south of the arctic circle. We really liked this area for a lot of reasons. The geography was pretty interesting with big, treeless scree covered mountains that were in clouds most of the time. The lower elevations were covered in scrawny muskeg forests. We camped in the area several nights and the weather changed continuously while we were there.

Making our way to the Arctic Circle
Rainbow at this camp spot

A lot of the time it was gray with clouds moving quickly through the valley. We were also treated to some warmer weather, rain storms, and really amazing rainbows while we were there. This spot gave us some of the best wildlife viewing along the Dempster Highway. We saw many Dall sheep, grizzly bears, and falcons.

At this point along the Dempster, the truck was pretty covered in mud. We also drove this area pretty slowly keeping an eye out for wildlife and just enjoying our time. Other than being a generally rocky area, the road was pretty good.