Truck Update 3/18/18

One of the main reasons that we decided to make a new habitat for our truck was that we really wanted to incorporate a passthrough into the cab of the truck from the living area. Honestly, we’ve been a little overwhelmed by the logistics of designing and building a passthrough for a while. We figured that now would be the best time to finish the passthrough details before we start assembling the habitat box.

Wabi-Sabi Expedition Truck Passthrough Exploded View

We designed our passthrough to have a frame assembly on the cab side and a frame assembly with door opening into the habitat side. The frames are connected with a water tight EPDM rubber bellows / accordion seal. The cab side assembly is made of 3 steel frames and can be disassembled to disconnect the bellows from the cab if future engine or transmission work requires that the cab be tipped up. The primary cab side frame is welded to the back of the cab.

The habitat side frame is made of 2 steel frames and 1 aluminum frame. The aluminum frame incorporates the door hinge and lock strike plate. The door opens inwards into the shower/bathroom/entry area of the habitat. The door is made from a 1 1/2″ thick insulated RV door panel. The hab side steel frame is bonded to the forward wall of the habitat prior to habitat box assembly.


  • Talked with vendors about passthrough bellows material
  • Finished design of passthrough
  • Cut steel for passthrough frames
  • Cut aluminum RV door frame extrusion material for passthrough door frame
  • Welded habitat and cab side steel pasthrough frame
  • Milled slots for passthrough door hinges in aluminum frame
  • Milled steel corner fillets for bellows connection
  • Welded and finished fillets
  • Ordered passthrough bellows material (ED-5389 from Uni-Grip)
  • Primed and painted habitat exterior passthrough frame

Aluminum Passthrough Frame Assembly

Steel Passthrough Frame Assemblies

Truck Update: 3/11/18

  • Ordered and received tile
  • Ordered and received LED eyeball lights
  • Ordered and received under counter LED lights
  • Ordered kitchen cabinet and locks
  • Ordered 2 1/2″ receiver pintal
  • Purchased marine adhesive for floor hardpoint bonding
  • Created assembly sequence list
  • Started passthrough design work
  • Started electrical wiring plan
  • Inspected position of floor on subframe
  • Measured and inspected all panels and corner extrusions
  • Trimmed foam to fit in hardpoint channel
  • Dry fit forward lower extrusion and front panel
  • Marked position of passthrough on back of cab

Habitat Update 3/8/18

Another big day for the project: we received all of our windows and doors from Tern Overland today. We got everything but the roof hatch, and it should get here in a little over a week (and certainly before we need it!). We spent some time inventorying everything we received, and it all looks very good.

We are especially excited that everything is double glazed so our habitat should stay nice and cozy. All the windows have integrated blackout blinds and screens, too.

Tern Overland Shipment

Habitat Update 3/2/18

It’s a big day for the new habitat: our custom habitat kit from Total Composites arrived today! More details coming soon as we get into inventorying everything, but here are a few photos from the day.

We had 2 hours to unload the container, but with the 2 of us and a friend it took less than an hour to unload. Most of the panels are quite light and can be carried by 2 people. The floor panel weighs a bit and required all of us (including the truck driver) to carry it.

The container had a tamper free lock from U.S. customs on it. The truck driver didn’t have a bolt cutter and seemed concerned when he showed up. It took just a second to cut the lock off with an abrasive disc on a grinder.

Sea Container Arrives
Panels After Removing Small Boxes
Panels After Inspection
Floor Panel on Subframe

Truck Update 2/28/18

  • Fit checked fenders and measured mount plate size
  • Fit checked habitat entry stairs on sub-frame
  • Fit checked passenger side jerry can mount
  • Made aft fender mount plates
  • Made passenger side jerry can mount spacers
  • Received water tank
  • Received auxiliary fuel tank
  • Received kitchen cabinets faces
  • Received weld sealant
  • Received stainless steel sink
  • Arranged shipping with Tern Overland for doors, windows and hatches
  • Purchase chain hoist
  • Purchased spare tire lifting sling
  • Purchased spare tire lifting shackles
  • Purchased welding supplies
  • Started modifying auxiliary fuel tank
  • Designed driver side jerry can, aux tank, storage box mount structure
  • Purchased extra steel strapping for driver side jerry can, aux tank, storage box mount structure
  • Cut all steel for driver side jerry can, aux tank, storage box mount structure
  • Cut steel for habitat stare mount
  • Cut steel for rear under bed storage box mounts
  • Welded driver side jerry can, auxiliary fuel tank, storage box mount structure
  • Fabricated tank hold-own clamp

Truck Update: 2/18/18

  • Ordered sink (Houzer CS-1307-1, Overall size 12.5″ x 14.375″, Bowl 12.06″ x 10.125″ x 6″ deep, stainless steel)
  • Ordered house systems fuel tank (RDS aluminum tank)
  • Trimmed aft subframe angle
  • Fit checked assembled angle on subframe periphery
  • Removed spare tire mount
  • Removed more unneeded small bracketry
  • Received  Air Head composting toilet
  • Received Froli stars (from Froli Systems)
  • Received mattress and fitted sheet (from Mattress Insider)
  • Purchased steel for storage accessory mounting
  • Started weld prep on subframe for periphery angle
  • Ordered passthrough bellows from Total Composites
  • Ordered cabinet faces for kitchen from Wayfair
  • Finished weld prep
  • Final test fit and clamped periphery angle
  • Started tack welding periphery angle
  • Ordered weld seam sealer (Eastwood seam sealer)
  • Welded periphery frame
  • Designed mounts for fenders, passenger side jerry can holder, and rear under bed storage boxes
  • Kitted mount material for fenders, passenger side jerry can holder, and rear under bed storage boxes
  • Fixtured and welded mounts for fenders, passenger side jerry can holder, and rear under bed storage boxes

Truck Update 2/11/18

  • Ordered special sized 8″ gel foam RV Mattress with organic cotton and fitted sheet (from Mattress Insider)
  • Ordered Froli Stars mattress springs (from Froli Systems)
  • Ordered Air Head composting toilet
  • Ordered and received reversible flow 1250 Fan-tastic fan (from etrailer)
  • Ordered water tank (from Plastic-Mart)
  • Started evaluation of weight distribution and placement of water tank
  • Installed forward shackle receiver and rewound winch cable
  • Trimmed off unneeded steel in multiple subframe areas
  • Trued up ends of subframe rails
  • Finalized layout of subframe
  • Cut steel angle for periphery of subframe
  • Drilled mounting holes in fore and aft angles
  • Fit check assembled angle on subframe periphery

Truck Update 2/4/18

We are really happy that our new habitat box is on its way from Total Composites. We received notification that the shipping process started last week. The box should get here around the end of the month / beginning of next month. Total Composites sent us a picture of our habitat ready to ship!

Total Composites Expedition Habitat Ready to Ship

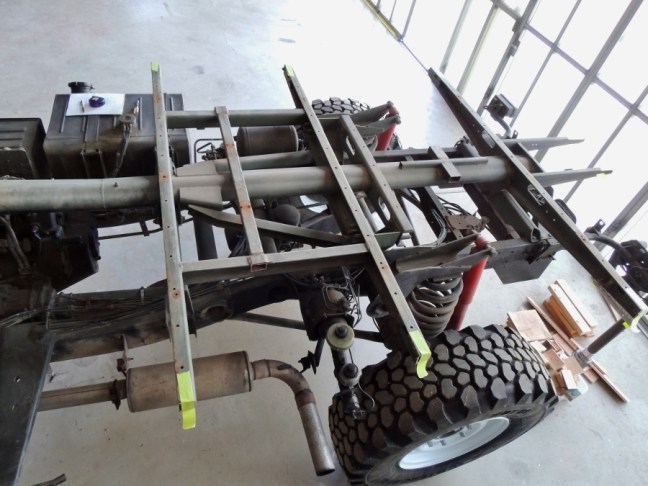
Now that our old habitat box is removed, it is time to get going on our subframe modifications. Our subframe is in great shape, and we are really happy with its layout. Our plan is to remove some unneeded material, make a new perimeter frame, create a habitat ladder mount, add understorage box and jerry can mounts, and add new fender mounts. Unrelated to the subframe but before our new habitat box goes on, we’d like to remove the old spare tire mount and possibly install a new fuel tank if time and availability permits.

U1300L Expedition Truck Subframe

To get our subframe work going, we went by a local steel supplier and picked up 138 pounds of steel for the subframe modifications.

Local Steel Supplier

Truck Update 2/3/18

We have been working over the last few weeks to get the old habitat ready to be transferred to the new owner. A crane came this morning and lifted the habitat from our truck to the new owner’s truck. Everything went smoothly. We’ll be ready to start subframe work soon.

Ready to Lift
Ready to Lift
Start of Lift
Start of Lift
Mercedes 435 with Habitat Box Removed

Truck Update 1/26/18

  • Started process of separating habitat from subframe
  • Made large jack extension
  • Rounded edges of receiver tang for forward shackle
  • Reduced size and weight of lug wrench
  • Made spacers for forward shackle retention bolt
  • Cut plywood shims in preparation for hab lift
  • Separated and lifted hab from subframe