
- Received and fit checked waterjet aluminum adapter plates for roof hatch
- Fit checked key blanks in truck
- Deburred and paint prepped aluminum roof hatch adapter plates
- Masked off bond areas on aluminum roof hatch adapter plates
- Primed and painted aluminum roof hatch adapter plates
- Disposed of scrap material from subframe
- Started laying out wiring diagram
- Started detail design of tire mount
- Laid roof panel on floor to prepare for edge champher
- Ordered habitat wiring
- Fit checked fantastic fan in roof panel cutout
- Champhered top edges of roof panel
- Received habitat wiring order
- Cut foam for core between aluminum hatch adapter plates
- Prepped and bonded top roof hatch adapter plate
- Routed top side of hatch opening
- Flipped over roof panel
- Champhered lower edges of roof panel
- Prepped and bonded lower roof hatch adapter plate
- Routed bottom side of hatch opening and removed excess composite panels
We encountered an unforeseen mix-up in the layout of our roof panel when we received the physical roof hatch from Tern Overland. It was a bit of a collaborative miss with everyone involved (us, Total Composites, and Tern Overland). When we originally laid out our roof panel, the orientation of the roof hatch was not obvious and we accidentally assumed that the hinge would be on the narrow side of the hatch like many American hatches. It was a bit of a surprise when we opened the box and read the instructions and found that our opening was rotated 90 degrees in our panel from what it needed to be.
We hadn’t actually specified dimensions of the hatch opening when we supplied the information for the box layout. We just specified the center position of the hatch and said that there needed to be an opening for the supplied roof hatch. We did, however, have a rectangle in the layout drawings that was longer fore-and-aft and narrower side-to-side. We had assumed that any needed details of the hatch layout would be double checked against the requirements of the hatch, but unfortunately, that did not happen.
The bottom line is that we should have requested the full installation instructions for the hatches, windows, and door prior to submitting our box layout for build. Also, it’s best to get instructions directly from manufacturers via email instead of relying on what is on websites as products and details online can change over time.
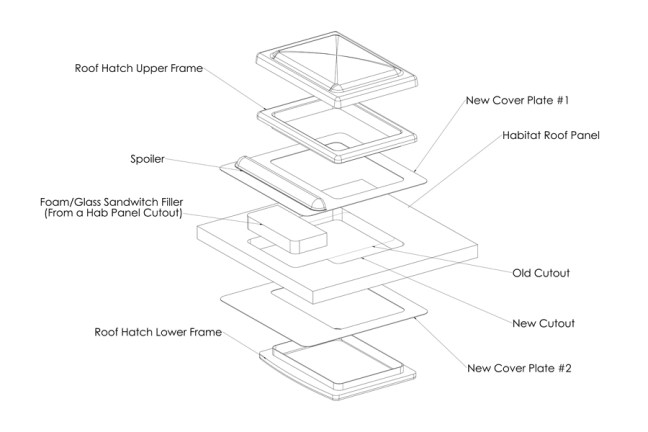
Overall, we have a pretty good recovery plan. We had 2 aluminum plates water jet cut that bond to the upper and lower surfaces of our habitat roof and act as “adapters” to rotate the orientation of the roof hatch cutout. The plates add minimal weight and actually reinforce the roof around the large roof hatch opening.


